
Sign up today and see the results for yourself!
Want to speed up your verification process?
Share a screenshot of your ad revenue from the past 3 months.
Segmenting inventory is the process of setting up custom channels so you can explicitly see how certain sections of your site or group of ad units perform versus another. It allows you to group relevant portions of the inventory so you can later easily run the reports and take action as necessary. It’s extremely useful because it allows easier visualization of the areas you need to work on.
This feature is only available on a mapped Google Ad Manager account.
Step 1: Log into Google Ad Manager
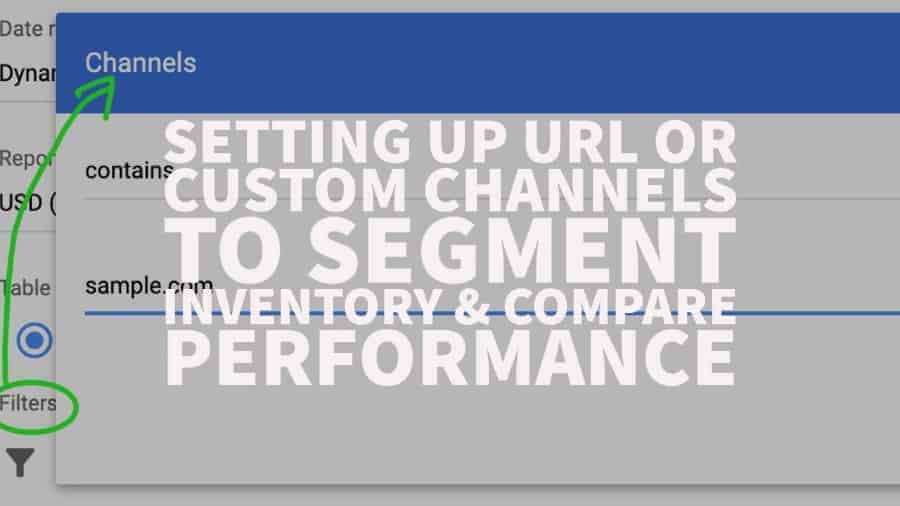
Step 2: Setup URLs
a) Inventory > URLs
b) Click New URL
c) Enter a URL or path

d) Select Inventory type
e) Select Brand type
Branded – advertisers and buyers will see the full URL (e.g. example.com/sports/football)
Semi-transparent – buyers will only see the root domain (e.g. example.com)
f) Click Save
To change the branding or status for an existing URL, tick it and select from the options as highlighted in the screenshot below:

Step 3: Setup Channels
a) Go to Inventory > Ad Exchange rules > Channels
b) Select the inventory type that applies to your site

c) Click New Channel
-Give your new channel a name that clearly describes it (e.g. Sample.com Football URLs)
-Specify the section of your inventory that should be part of this channel
-Under Inventory URL, select the URL/s by clicking on the ✓

-Set up targeting for the rest of the parameters as needed. REMEMBER, what you target is where the rule applies to. Not selecting anything, means it will target everything. For example, if you didn’t target any ad units, it will target ALL ad units.
-Click Save
d) Create more channels as necessary
Custom Channels allow you to segment your traffic and review performance. With this strategy, you can compare how a certain group of ad units is performing versus the other, or how above the fold ads do against below the fold counterparts.
You have many options with Custom Channels unlike built-in reports because it’s something you can create and customize yourself and you are then able to quickly identify which part of the inventory needs attention.
Here are some examples:
Step 1: Countries
a) Tier 1 countries vs Rest of the world
b) US vs Rest of the world
c) Top 5 countries
Step 2: Inventory size
a) Large sizes vs Small sizes
b) Vertical sizes vs Horizontal sizes
Step 3: Device Category
a) Desktop + Tablet vs Mobile
b) Desktop vs Mobile
c) Desktop vs Tablet vs Mobile
Step 4: Site section
a) This applies if you have a separate set of ad units in different categories of the site or use Key-Value Pairs.
b) Homepage ad units vs Content ad units
News vs Sports
Step 5: Ad placement
a) Above the fold ad units vs Below the fold ad units
b) Mid-content units vs Sidebar units
Now that you have segmented your inventory with Custom Channels, it is crucial that you monitor your reports and take action when necessary.
Step 1: Go to Reports
Step 2: Click New Report
Step 3: Select Ad Exchange Historical for the Report Type
Step 4: Set the date range
Step 5: Set up a Filter if needed to isolate the data

Step 6: Select Channels for the Dimension

Step 7: Select the Metrics
Step 8: Run
Pay attention to any abnormal spikes or drops, sections with low viewability, or any outliers compared to other aspects in your reporting. Use this data to optimize your site’s performance.
Want to learn more in-depth ad optimization strategies through step by step over the should videos that teach you how to master your ad inventory? Enroll in PubGuru University today!

Marketing MBA and Global Marketing Manager at MonetizeMore.


10X your ad revenue with our award-winning solutions.